This comprehensive guide provides detailed instructions on how to format a USB drive to FAT32 using any Windows PC or Mac computer. The formatting process is straightforward and typically takes less than five minutes.
Many users encounter difficulties when attempting to connect their USB drives to devices such as Amazon Firesticks and other Android-powered gadgets. A common issue is that these drives are not formatted as FAT32, which is essential for compatibility.
FAT32, or “File Allocation Table 32,” refers to the 32-bit version of the FAT file system. This format is widely utilized for USB drives, external hard drives, and memory cards, ensuring seamless compatibility across various platforms.
Important Note: Formatting a USB drive will erase all existing data. It is crucial to back up any important files before proceeding with the FAT32 format.
It is important to note that the disk utility on Windows PCs only permits FAT32 formatting for USB drives that are 32GB or smaller. However, this tutorial will guide you through methods to overcome this limitation. Additionally, we will explain how to use Disk Utility on Mac computers to format USB drives of any size to FAT32.
How to Format USB to FAT32 – Video Guide
Formatting a USB Drive to FAT32 on a Windows PC
To format your USB drive to FAT32 on a Windows PC, please follow the step-by-step screenshot guide below.
Note: The first set of instructions is tailored for users with a 32GB USB drive, followed by guidance for formatting a 256GB USB drive.
1. 32GB USB Drive
1. Insert your USB drive into your Windows PC. Windows File Explorer should open automatically.

2. Locate and select your USB drive. In this example, the USB drive is labeled “SANDISK32.”

3. If your USB drive is 32GB or less, you can easily format it using Windows Explorer. Right-click on your drive and select Format from the context menu.

4. In the Format window, use the dropdown menu to change the File system from “exFAT” to “FAT32.” Then click Start to initiate the formatting process.

5. A warning message will appear, notifying you that formatting the USB drive will erase all data. As previously mentioned, ensure you have backed up any important files. Click OK to proceed.

6. Once the formatting is complete, a confirmation message will display. Click OK to acknowledge that your USB drive is now formatted to the FAT32 file system.

7. Next, move your cursor to the bottom right-hand corner of your screen and click the up arrow. Then click the USB icon.

8. Select “Eject Cruzer Glide” from the list to safely eject your USB drive.

9. You can now safely remove your USB drive from the port.

256GB USB Drive
1. Insert your 256GB USB drive into your Windows PC. Windows File Explorer should open automatically.

2. Right-click on your USB drive in the menu and select Format. In this example, the USB drive is labeled “SANDISK32.”

3. Click on File System, and you will notice that FAT32 is not available in the dropdown list.

Note: Windows does not allow formatting drives that are more significant than 32GB using the essential formatting tool.
4. To overcome this limitation, you will need to install a free drive utility called “Rufus.”
Visit the official Rufus website at https://rufus.ie.

5. Scroll down and select the latest release of Rufus, which is 3.12 as of this writing.

6. Save the Rufus installer to your Downloads folder and click Save.

7. Once Rufus is finished downloading, click the Rufus icon in the bottom left corner of your screen and select Yes when prompted.

8. After Rufus opens, click on Boot Selection.

9. From the dropdown menu, choose Non-bootable.

10. Next, click on File System, and you will see the option for Large FAT32 format. Select that option.

11. Click on Show Advanced Format Options and uncheck the box labeled “Create extended label and icon files.”

12. Then click the Start button to begin the formatting process.

13. When the warning message appears, click OK to proceed.

14. That’s it! Your 256GB USB drive is now successfully formatted to FAT32. You can exit the Rufus program.

15. To safely eject your USB drive, click the icon in the bottom right corner of the screen and select Eject Ultra.

Formatting a USB Drive to FAT32 on Mac Computers
If you are using a Mac computer, follow the step-by-step instructions below to format any USB drive to FAT32.
One advantage of formatting USB drives on a Mac is the built-in Disk Utility tool. This utility allows you to easily format USB drives of any size to the FAT32 file system.
1. Open Finder and select Applications from the left menu.

2. Navigate to the Utilities folder.

3. Click on Disk Utility to open the application.

4. Highlight your USB drive from the list of available drives.

5. Click the Erase button located in the top menu.

6. In the Format dropdown menu, select MS-DOS (FAT), which is the equivalent of FAT32.

7. Click the Erase button to initiate the formatting process.
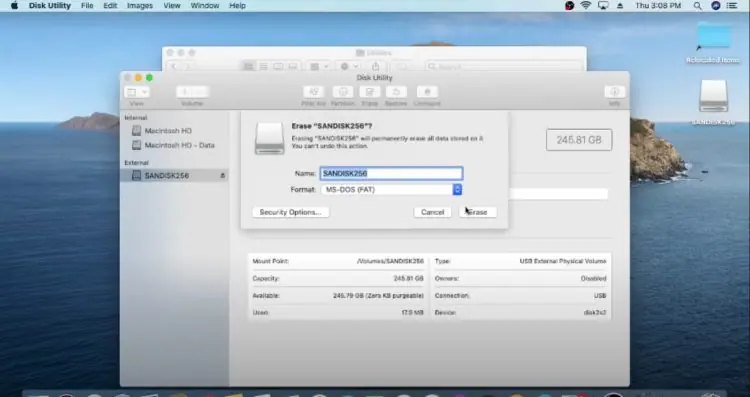
8. Once the process is complete, click Done.
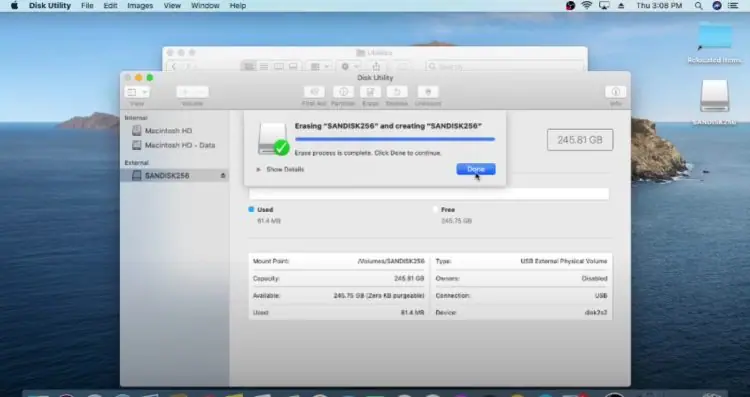
9. You will notice that your USB drive is now formatted to FAT32.
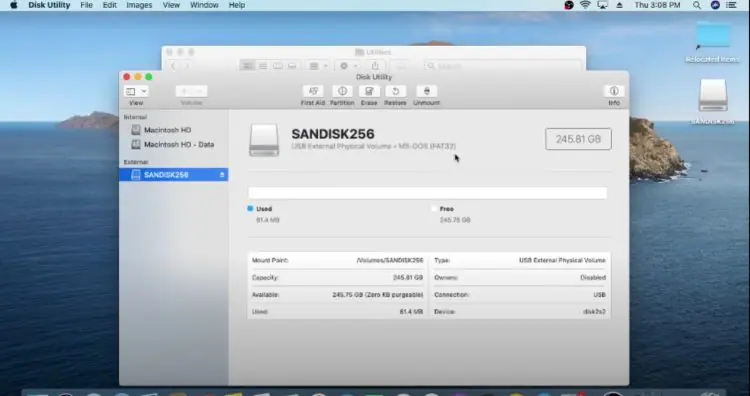
10. Before physically removing your USB drive from your Mac, click the Eject button next to your drive to ensure it is safely disconnected.
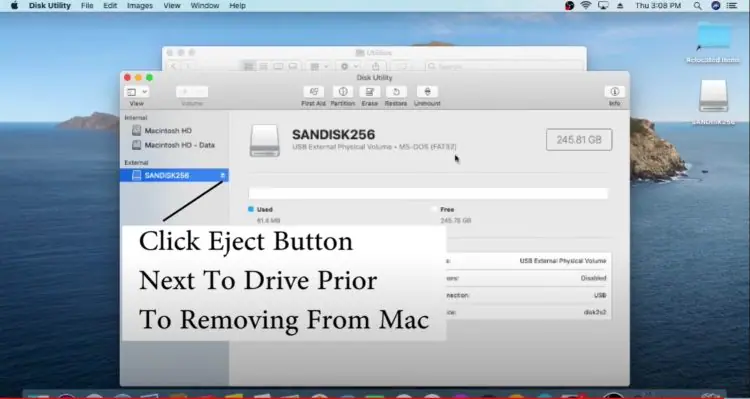
Congratulations! You have successfully formatted your USB drive to FAT32 on your Mac computer.
Now that your USB drive is formatted to FAT32, it should be compatible for use with Android-powered devices and other systems.
Although the FAT32 format is an older file system, it remains widely compatible with most streaming devices, phones, tablets, and computers.
Using a USB drive with an OTG cable is an excellent way to expand storage on a Fire TV Stick. This method is prevalent among users of TiviMate and other IPTV players for recording IPTV content.
Frequently Asked Questions
Can I format a USB drive more prominent than 32GB to FAT32 on a Windows PC?
Yes, but Windows does not provide the option to format drives more significant than 32GB to FAT32 using its default tools. You will need third-party software like Rufus to format larger drives.
What happens when I format a USB drive to FAT32?
Formatting a USB drive to FAT32 erases all existing data on the drive. Make sure to back up any important files before starting the process.
Why should I use the FAT32 format for my USB drive?
FAT32 is widely supported across various devices, such as streaming devices, smartphones, tablets, and computers, making it an ideal format for compatibility.
Can I format any USB drive to FAT32 on a Mac?
Yes, the Mac’s built-in Disk Utility tool allows you to format USB drives of any size to FAT32 (shown as MS-DOS (FAT)).
What is the difference between exFAT and FAT32?
FAT32 has a file size limit of 4GB per file, while exFAT allows larger file sizes. However, FAT32 is more widely supported across older devices and platforms.
How do I safely eject a USB drive after formatting it?
On Windows, click the USB icon in the taskbar and select “Eject.” On Mac, click the eject button next to your USB drive in Finder to safely remove the device.
Will formatting to FAT32 affect my USB drive’s performance?
Formatting to FAT32 won’t significantly affect performance, but it does impose a 4GB file size limit. If you need to store larger files, consider using exFAT or NTFS instead.
Conclusion
Formatting a USB drive to FAT32 ensures broad compatibility with a wide range of devices, including streaming devices, smartphones, tablets, and computers. Whether you are using a Windows PC or a Mac, the process is straightforward, although Windows requires third-party tools for drives larger than 32GB.
By following the step-by-step instructions provided, you can easily format your USB drive to FAT32 and use it across various platforms, making it a reliable option for media storage, device expansion, and more.
